Showing posts with label DIY. Show all posts

Sunday, 9 March 2014

Red Hair - Matrix SoColor SoRed

My post on lightening dark Asian hair without bleach seems to be doing pretty good traffic-wise. So, I have decided to do another post on hair colour. I have been colouring my own hair since I was 19/20 and I have done my best friend's hair as well a couple of times. I don't think I have been to a salon in over a year, I snipped of my layers at home when I started lightening my hair to get rid of the thinning at the ends.
Anyway, this post is about red on virgin black hair. We used Matrix SoColor SoRed (the normal red shade they have) with the 30 volume Streax developer I have been using(read about it and what kind of developer to use in the above link). We got them from medplusbeauty, but the colour is out of stock it seems. It was very difficult to get a reasonably priced red from an Indian e-store, the L'Oreal Excellence HiColor Red HiLights every youtube vlogger raves about (for using on dark hair without bleach) costs somewhere north of INR1500($25), which is too much I think for some fun experimentation. This Matrix colour was INR290($4.75) and it worked pretty good. The hair that processed for about 2 hours was the brightest red. The ones at the top were kept for a little more than an hour and even though it wasn't as bright, it was pretty obviously red. According to this website, it deposits so much pigment that the first few shampoos there will be some excess dye bleeding out.
See the before and after results.

matrix socolor sored red hair

She only wanted strategically placed streaks which will show through her braids, she does mean braids, that girl does. See another photo of Rashmirekha with her red hair here.


Thursday, 5 December 2013

How To: Lighten Dark Asian Hair Without Bleach

Be patient. No, seriously! It is your hair we are talking about here.
I have wanted to colour my hair for as long as I can remember. I know many beauty/hairstyle bloggers/vloggers say they have been colouring their hair since they were 11 (I haven't heard anyone mention lower than that). I wish I could start early too. The thing is most of them live in the western hemisphere. The school years were slightly different on this side of the pond. We wore uniforms and there are still dress codes everyone has to follow. We had to keep our hair in non-fussy ponytails or braids unless it was too short to be tied up. Also, generally no bangs were allowed, you had to pin them up. Lord knows how many times I got told to tie up my hair or to tuck in the loose layers, but I just didn't like their policing something as trivial as hair. Anyway I hate tying it up now, I mostly keep my hair down, I guess 18yrs of subservience to stupid school uniform rules does that, I am only recently getting into wearing skirts comfortably enough and not feeling school girly doing so. We had little to no scope for experimentation is what I am staying. The outcome would have been like this or worse.

I have slowly gathered info on DIY hair colouring and lightening for many years now. I had to improvise because all the information was by people who already had light hair to begin with and had access to all these products that I didn't. There is info out there regarding dark hair but, it is not too easy to find or follow (there are always different methods of doing a single thing). When I grew frustrated I even tried to find methods where I didn't have to lighten my hair to colour it. Here's the post on - How To Do Pastel Hair (if you do not have chalk pastel), then again it was temporary, a 24-48hr thing. If you see this post you'll see I did the ombre red hair - Almost Famous, but the red showed up most prominently in light, it was pretty red in sunlight, and I loved having red hair.
This is a text heavy post, there will be a couple of photos too. Let's jump right in.
Indian girl with blue hair
yes this is how my hair looks right now :) .. blue streaks and all
This is for those who have non-dyed/dyed dark hair. You can use this method if you want to lighten your hair a few shades no matter what your hair colour is to begin with. I have coloured my hair before without lightening it and I never wanted to use bleach. So, I didn't use bleach. I get asked how I "coloured" it a lot. When I say I didn't, that I just lightened it, I get a lot of confused looks. After mentioning bleach a couple of times a semi-confused I-think-I-get-it kind of look dawns on their faces, because they recognize the word bleach and what it does. But, I told you I didn't use bleach.

What You Will Need
  1. Baking soda
  2. Developer (I used 30 volume, you can use 20vol., 30vol is stronger). Bought it here for INR90 (less than $2)
  3. Shampoo (any would do)
  4. A plastic bowl
  5. Brush
  6. Gloves
  7. Aluminum Foil/Shower Cap
#How to use?
A. I used developer, shampoo and baking soda in 4:3:1 ratio. I am giving you a ratio because the quantity depends on how much you will need based on how much hair you will be lightening (as much as I did, whole head, just a few streaks). Throw away leftovers, it goes bad. I used a scooped plastic spoon for measuring (it probably came with some detergent packet).
#Procedure
A. Mix everything in the bowl with the brush wearing your gloves. Massage it in your damp (not wet) hair for better absorption. Wrap up the hair in foil or shower cap, this keeps it from touching your skin and clothes and also keeps the heat in. If it touches the skin just wipe it off with water, it doesn't burn like bleach would have. I used my blow drier a couple of times on the foil, because I was doing the tips which wasn't getting any reflected heat from the scalp. I had to keep it in for 45-60 minutes (time it from when you start not when you end application) even though some would suggest not to exceed 20-30mins. I saw no change till the 45th minute. If the hair feels too dry just wash it off. Keep an eye on it essentially. Just use water to wash it off. Then deep condition it.

dark to blonde hair without bleach
these are phone photos
I didn't expect it to be so much lighter after the very first time. I deep conditioned and applied coconut oil in my hair the next week. I repeated this whole process again a week later. Deep conditioned. Oiled. Then repeated again only on the patches which seemed darker than the rest of it.
You can carry on lightening further if you want pastel hair. If it gets too brassy though use a blue/green toner to neutralize it. I didn't have to because I don't want pastel shades, I wanted a darker shade.
Go to this website - Not So Mundane for all your research. Chloe's blog is a treasure trove of hair colouring related info and you can ask her questions if you have any queries. I wished I had found it earlier. I found her when I had started with the lightening process already, but realised I didn't know how many more times I have to keep doing it.

FAQ
#What is this method called?
A. It is called soap capping. Instead of baking soda you can use bleach. It is a gradual process. The hair gets to rest in between lightening sessions.

#How to choose a developer?
A. The hydrogen peroxide in the developer activates the baking soda/bleach and that is what lightens your hair. The 40vol has 12% hydrogen peroxide and is very very strong, it is not recommended that you use it at home. 30vol has 9% hydrogen peroxide, it is strong, but if you have strong enough hair that can take it you can use it. Otherwise, stick to low strength developers like the 20vol(recommended if you want to be on the safe side) and the 10vol.
P.S. - If peroxide is available to you it can be used as well. You have to adjust the quantities though. 3:1:1:3 ratio of developer, peroxide, baking soda and shampoo according to this article.
#Will this damage my hair?
A. You will know the answer to that. Do you have unhealthy hair? If it has split ends, is generally weak and thin or very dry and rough then don't experiment with your hair. Go to a doctor to see what is wrong. It might be a health issue. If you have coloured it before and nothing has happened then go ahead I say.
#Now can I colour it blue/red/pink/green?
A. Yes! I loved the honey blond shade I got after the 1st stages of lightening. So, I stuck to it. I am going for random streaks from time to time though. After another haircut I may dip-dye the tips completely. You can buy blue, green and violet shades from here (each tube costs INR120, about $2).
#What products did you use?
A. I used Streax Pro 30 volume Developer and for the colour I used Streax Pro Salon Premium Hair Colourant Creme Blue.
I hope I have included everything that I did, and that you would find this informative and helpful if you are planning on colouring your hair any unnatural shades at home. Ask me anything if you have any queries. You can leave behind a comment, an email, a tweet, I even have a formspring where you can ask away anonymously (all links on the sidebar). If you have any info about where I can buy more colours from any Indian website you know of (apart from medplusbeauty.com) then let me know.

Follow songbird

Wednesday, 13 February 2013

I Gave You All

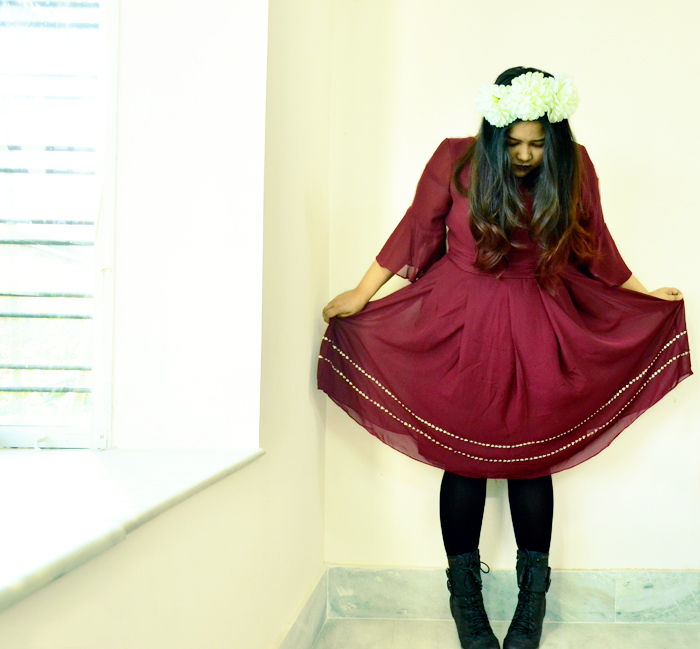
I got this dress custom made. The amazing people at Miss Dressy sent me over this dress in exactly 14 days! I was supposed to attend an event but didn't really believe the dress would come over that fast. I selected this dress and chose a colour other than black or white (are you surprised? well you have my best friend to thank for that, as she chose this beautiful colour, otherwise this post would have been another offering in black). There are plenty of options in colours and sizes and they have loads and loads of styles of dresses in varying lengths and silhouettes!
I love the beautiful chiffon bell sleeves. The name of this colour is oxblood claret. And I will stop saying I love flower crowns and reblogging and pinning their
photos on tumblr and pinterest (click to follow) as I have started wearing them now. No, I won't. I love florals and flower crowns, the more photos of these on my dashboard the better. This outfit and the mood is obviously inspired by my love for the romantic gothic aesthetic. The crown was a DIY done by a friend.


Also I am on Instagram now. Yes I finally got a new phone that does something apart from just texting and calling. 3 solid claps for me *and then I do a dance that you don't get to see*.
Follow me @debi_flysongbird
I am lonely here.
So hurry :)
adios


P.S. - Use the code 706519651810  to get a flat 30% off on 13th and 14th Feb on IKNOW

Wednesday, 23 May 2012

Wine Bottle DIYs

I love how beautiful these look. My DIY skills are below newbie level and I don't think I can ever make these.. But I sure can help someone do them...they look so pwetty!!!!

candle holders or candle covers
Wall-Mounted Vases

Lighted Wine Bottles

Centerpieces


♥


P.S.- R.I.P Community original team..let's see what the new team does with you now. But the last eps were awesomeness galore. 


Friday, 30 March 2012

How To Do Pastel Hair (if you do not have chalk pastel)

I rarely ever do tutorials but I could not pass this one.
As I told you the only thing stopping me from doing the pastel hair colour was the lack of chalk pastels. For whatever reason nearby shops only have oil pastels with them. I have a play to attend tomorrow which my college mates are doing and I will be helping with make-up. I wanted the pastel hair so bad for tomorrow that I took it up as a challenge to improvise.

chalk pastel hair colour
What I used
  1. Colour blocks from an old water colour box (I had them lying around)
  2. A thick paint brush to water the hair
  3. Curling iron(straightening iron would work just fine)
What I did
  1. Took a small section of hair and twisted it
  2. With the paint brush I dabbed water on the twisted end of the hair. Made sure it was almost dripping wet
  3. Took a block of colour and rubbed it till I could see the colour on my hair
  4. When it was a bit damp and the colour seemed enough I used the mild hot curling iron


That's it guys. I hope the colour will stay till tomorrow. I have clipped it away carefully tonight.I didn't read anywhere how hairspray would affect the colour so I am not going to use it on the colour. It will wash away with shampoo. I don't think it will damage the hair because it is temporary. I can become addicted though.


chalk pastel hair colour

So what do you think?

P.S.- The colour stayed for about 20 hours. I washed it off when I came back. No visible damage was done. It didn't stain my hair. Don't forget to condition as this takes out moisture from the hair. I liked the blue the best. I think I will try out a better shade of green next time...and also try to improve from this attempt. I was happy with my 1st attempt nevertheless.

Tuesday, 27 March 2012

My Wishful Thinking

I have been longingly looking at pastel hair colour since last year. Recently I heard that it can be done temporarily with chalk pastels (yes you read it right). I have been dying to try it since then. I just need to get the chalk pastels.

What You’ll Need
Soft Pastel Chalk (no oil)
Water Filled Spray Bottle
Gloves
Blow Dryer
Flat Iron
An old t-shirt you don’t mind ruining.

1. Take a 1-inch strand of hair and wet it with a spray bottle (skip this step if you already have blonde hair)
2. Apply gloves and take a pastel of your choice. Rub it on your hair strand until it’s at your desired vibrancy 3. Blow dry the hair strand until completly dry.
4. Go over the strand with your flat iron. This will help set it in. Make sure it’s on its lowest setting.
5. Brush and style as usual!
This will wash out during your next shampoo, so do as many strands as you’d like!


Look how hot this Tom Ford red lipstick looks! It's sinfully good!


I think I just died this is so beautiful!


Nail Art Love


I have fallen in love with braids of all kind recently.. Fishtail is awesome and very easy to do!


In other news I want to thank Aki of Seven Percent Solution for the amazing Versatile Blogger award. :)
Thanks a lot!
It's already so very hot over here. We entirely skipped spring and it's only going to get hotter. I am going out in my comfiest outfits. Loose pants, cotton tops, kajal and lip balm(which I eat off by the middle of the day). I went to watch The Hunger Games on Saturday. I went out and bought the whole series. I am so looking forward to actually sitting down and reading it. I have one exam after the other, a project, a home assignment.. and I am doing all this while catching up on other blogs, getting inspiration, watching new TV show episodes, trivia hunting, cinema hoarding and snoozing.
And how do you like my new blog header? I updated it shortly after my last post.


Sunday, 1 January 2012

2012

My parents are building the upper floor of our house and soon I will have a new room, so I am a getting inspired by these decor ideas..Some awesome inspiration from Pinterest

I think I should finally indulge in a bandana/scarf-(secret style desire ;-) )

And find out a bit more about mysticism/occult
Ruth st Denis
Feel beautiful no matter how big and what shape

I promise myself to get a pair of flat shoes this year and face it that I cannot walk on even stacked heels..Flats like this Christian Louboutin Freddy Flats would be nice :-D


This is my new Facebook Profile Photo

Wise ass words


Would you try this? I am tempted I must say


Hope you had a very good 1st day. I almost burned down the house today :).
Ciao!


Saturday, 25 June 2011

The Shaggy haircut , The Choppy layers

"The New Shag" article (in the Vogue India June 2011 issue) provoked me to do this to myself. I have been thinking of getting a haircut. But Freja Beha's photo with the shag which has a rock n roll feel to it just drove me over the edge. She walked the runway last year with this new hairstyle.

Freja Beha Erichsen with her shag
Out came my scissors and hairbands, I opened my YouTube channel and searched for a tutorial. I found this amazingly easy video and followed it. I had once done my own bangs before so I was not shaky. I find a cathartic pleasure in chopping of my own hair. It's like taking control. Here is the video


You can wear the shag as you like. The length depends on you. I have thin hair so I wasn't going to use the razor technique. In a salon someone once did it and the result was not good. Anyway I have changed to a better salon now thanks to my best friend. I will wear my layers messy. The shag is the ultimate do nothing haircut and brings in a lot of edge depending on its length and styling. I cut it according to what I thought would look good on my round face.


And Michael Jackson r.i.p.


Follow songbird

Thursday, 2 June 2011

How to -Curly and Voluminous Hair

Michelle's Style File asked for a tutorial on my hair in this post and some others(like Kristina Lennon-fashion's answer to miss marple!) complimented it and commented on it as well(i thank all who did).So here it goes:
1.after washing my hair I let the hair dry out partially so it isn't dripping wet.
2.I divide my hair in two parts(the same way you would for a half up half down hairdo).
3.twist the the upper portion.Then hold it firmly and push it slightly forward to create a pouf.
4.hold it in position and wrap the twisted portion around itself.
5.do the same for the lower portion and secure them with bobby pins.
I know it looks very weird.I love going around the house like this

I left this overnight and before opening it I sprayed some hairspray about 15-20mins ahead of opening.